LED is a light-emitting element made of a semiconductor material that emits light when energized. The material uses III-V chemical elements (such as gallium phosphide (GaP), gallium arsenide (GaAs), etc.), and the principle of light is to convert electrical energy into light. That is, a current is applied to a compound semiconductor, and a combination of electrons and a hole is transmitted, and excess energy is released in the form of light to achieve a luminescent effect, which is a cold luminescence.
The biggest feature of LED is that it does not need idling time, fast reaction speed (about 10^-9 seconds), small size, low power consumption, low pollution, suitable for mass production, high reliability, easy to match. Applications need to be made into very small or array-type components, such as automotive, communications industry, computers, traffic signals, backlights for LCD panels, LED screens, etc.
The LED industry can be divided into three categories: upper, middle and lower. The upstream is a single chip and its extension, the middle reaches for LED chip processing, and the downstream for package testing and application. Among them, the upstream and middle reaches have higher technical content and the capital input density is large. From the upstream to the downstream, the product is quite different in appearance. LED color and brightness are determined by epitaxial materials, and epitaxy accounts for about 70% of LED manufacturing costs, which is extremely important for the LED industry.
The upstream is formed by the epichip, which is roughly a circle with a diameter of six to eight centimeters wide and a relatively thin thickness, like a flat metal. Common epitaxial methods include liquid phase epitaxy (LPE), vapor phase epitaxy (VPE), and metal organic chemical vapor deposition (MOCVD). VPE and LPE technologies are quite mature and can be used to grow general brightness LEDs. The growth of high-brightness LEDs must use the MOCVD method. The upstream epitaxial process sequence is: single chip (III-V substrate), structural design, crystal growth, material properties/thickness measurement.
The midstream manufacturers carry out the device structure and process design according to the performance requirements of the LED, diffuse through the epitaxial wafer, and then metallize the film, then perform photolithography, heat treatment, and form a metal electrode, and then the substrate is polished and polished to be cut. According to the size of the chip, it can be cut into 20,000 to 40,000 chips. These chips look like sand on the beach and are usually fixed with special tape before being sent to downstream manufacturers for packaging. The process sequence of the mid-stream chip is: epitaxial chip, metal film evaporation, photomask, etching, heat treatment, cutting, cracking, measurement.
Downstream includes package testing and application of LED chips. The LED package refers to connecting an external lead to an electrode of the LED chip to form an LED device, and the package functions to protect the LED chip and improve light extraction efficiency. The downstream manufacturers package processing sequence: chip, die bonding, bonding, wire bonding, resin packaging, long baking, tin plating, shearing, testing.
Instruction Manual
1. Features
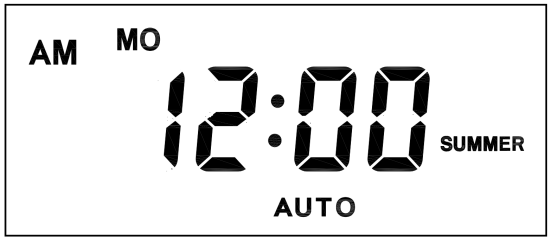
Clock display, 10 sets of adjustable timed power control, randomized power control, manual switch and optional DST setup.
2. First time charging
This Timer contains a rechargeable battery. It is normal that the new/old model runs out of battery if it wasn`t being charged for a long period of time. In this case, the screen will not turn on.
To charge : simply plug the timer to a power outlet. The charging time should take at least 15 minutes.
If the screen doesn`t light up or displays garbled characters, simply reboot the system by pressing the [RESET" button.
3. Set clock

Hold [CLOCK" button and [WEEK" button to adjust week.
Hold [CLOCK" button and [HOUR" button to adjust hour.
Hold [CLOCK" button and [MINUTE" button to adjust minute.
Hold [CLOCK" button and [TIMER" button to select 12 hour/24 hour display.
Hold [CLOCK" button and [ON/AUTO/OFF" button to enable/disable DST (daylight-saving-time).
4. Set timer
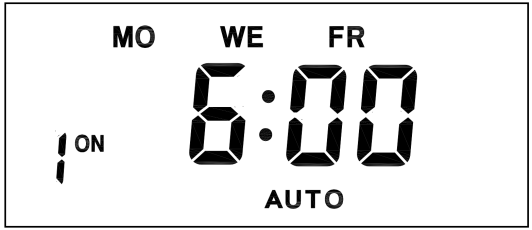
Press [TIMER" button, select and set timer. Setting rotation : 1on, 1off, 2on, 2off, ...... , 10on, 10off.
Press [HOUR" button to set hour for timer.
Press [MIN" button to set minute for timer.
Press [WEEK" button to set weekday for timer. Multiple weekdays can be selected. ex: if selected [MO", the timer will only apply on every Monday; if selected [ MO, WE, FR", the timer will apply on every Monday, Wednesday and Friday.

Press [RES/RCL" button to cancel the selected on or off timer. The screen will show "-- -- : -- --" , the timer is canceled.
Press [RES/RCL" button again to reactivate the timer.

When timers are set, press [CLOCK" to quit timer setting and return to clock.
5. Random function

Press [RANDOM" button to activate random function, press again to cancel function.
System only runs random function when [AUTO" is on.
Random function will automatically start the timer from 2 to 32 minutes after the setting.
ex : if timer 1on was set to 19:30 with the random function on, the timer will activate randomly between 19:33 to 20:03.
if timer 1off was set to 23:00 with the random function on, the timer will activate randomly between 23:02 to 23:32.
To avoid overlapping, make sure to leave a minimum of 31 minutes gap between different sets of timer.
6. Manual control
Displayed features:
ON : socket turns on.
OFF : socket turns off.
AUTO : socket turns on/off automatically via timer.
Manual ON setting
Press [ON/AUTO/OFF" button to switch from [AUTO" to [ON".
This mode allows socket of the device to power up. Power indicator will light up.
Manual OFF setting
Press [ON/AUTO/OFF" button to switch from [AUTO" to [OFF".
This mode turns socket of the device off. Power indicators will turn off.
7. Electrical parameters
Operating voltage : 230VAC
Battery : NiMh 1.2V
Power consumption : < 0.9W
Response time : 1 minute
Power output : 230VAC/16A/3680W
Q&A
Q: Why won`t my timer turn on?
A: It`s out of battery, you can charge the timer by plugging onto any power outlet. Charge the device for at least 15 minutes. Then press [RESET " button to reset the device.
Q: Can I set seconds of the timer?
A: No, the smallest time unit is minute.
Q: Does my timer keeps old settings without being plugged onto a power outlet?
A: Yes, the timer has an internal battery, it allows the timer to save settings without a power outlet.
Q: Is the battery rechargeable?
A: Yes, the battery is rechargeable. We recommend to charge it for 4 hours so the battery is fully charged.
Q: Does the timer needs internet connection?
A: The timer does not need internet.
Q: Does the screen have back light function?
A: It doesn`t support back light.
digital timer, digital timer socket, electronic timer socket, timer socket
NINGBO COWELL ELECTRONICS & TECHNOLOGY CO., LTD , https://www.cowellsocket.com