Unlike traditional Siemens PLCs such as S7-300, WinAC RTX is a soft PLC that runs within a Windows environment. This means its configuration and programming methods differ from those of conventional PLCs. There are five main ways to configure and download programs to WinAC RTX, as illustrated in Figure 1:
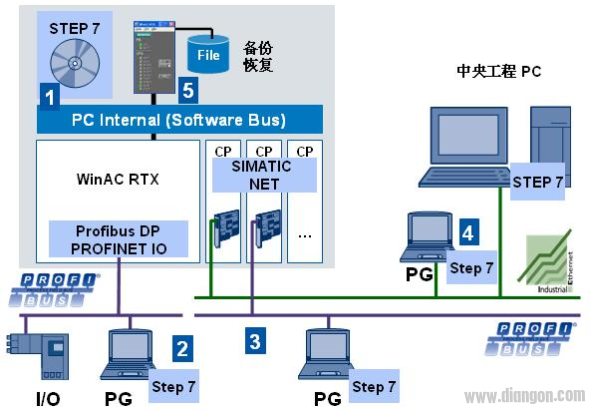
Figure 1
1. Install WinAC RTX alongside Step 7 on the same SIMATIC IPC. This allows Step 7 to communicate with WinAC RTX through the PC Internal (Softbus) channel, enabling configuration and program downloads directly.
2. Connect the Step 7 programming device via PROFIBUS/PROFINET to the communication card, which acts as a WinLC RTX submodule (SubSlot). Configuration and programs can then be downloaded using the integrated communication interface of the S7-300, similar to standard configurations.
3. Use PROFIBUS to connect the Step 7 programming device to the PROFIBUS interface of the communication card configured as a PC station where WinAC RTX is installed. The data travels through the Soft Bus route to reach WinLC RTX for configuration and program downloads.
4. Connect the Step 7 programming device via Ethernet to the Ethernet interface of the communication card set up as a PC station with WinAC RTX. The program is then transferred through the Ethernet communication card and the Soft Bus route to the WinLC RTX.
5. Use the "Restore" option in the Control Panel menu of WinLC RTX to restore a previously backed-up configuration and program.
The following examples explain each method in detail.
Method 1: As shown in Figure 2, there is a Siemens IPC with both WinAC RTX and Step 7 installed. The PC station name used for configuration is "Way1".
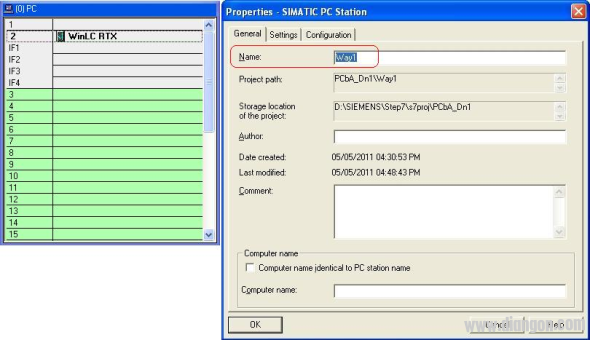
Figure 2
Open the Station Configuration Manager either by double-clicking its desktop shortcut or clicking the small computer icon in the system tray. In the Station Configuration Editor, check and set the PC station name to "Way1", matching the hardware configuration in Step 7, as shown in Figure 3.
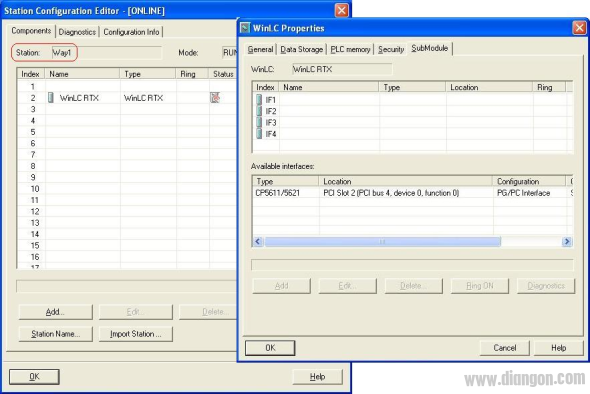
Figure 3
Before downloading, ensure that the components in the virtual slots match those in the hardware configuration. For example, only one slot should have WinLC RTX, with its four sub-slots empty. Then, open the "Set PG/PC Interface" window under the "Options" menu in Step 7. Select "S7ONLINE (STEP7) → PC Internal (local)" and click "OK" to complete the setup. Once WinLC RTX is started, the configuration and program can be downloaded.

Figure 4
It's strongly advised not to install Step 7 on Microbox or EC31 devices that come with pre-installed Windows. This could consume valuable CF card space and cause unnecessary background processes that affect system performance.
Method 2: As shown in Figure 5, a Microbox 427 comes with WinAC RTX F pre-installed. The built-in PROFIBUS interface of the Microbox 427 is configured as a WinLC RTX F submodule (SubSlot).
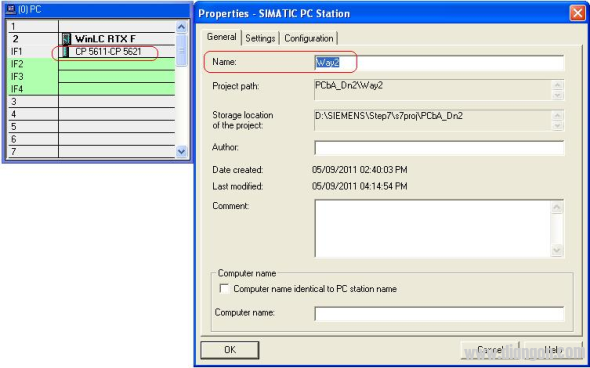
Figure 5
Launch the Station Configuration Manager from the desktop shortcut or the system tray icon. Set the PC station name to "Way2" in the Station Configuration Editor, matching the hardware configuration. Ensure the components in the virtual slots match those in the Step 7 project, as shown in Figure 6.

Figure 6
Connect the PROFIBUS interface of the programming device (e.g., a PC with CP5611) to the Microbox 427 using a PROFIBUS cable. Open the "Set PG/PC Interface" window in Step 7 and select "S7ONLINE (STEP7) → CP5611 (PROFIBUS)" to complete the configuration. After starting WinLC RTX F, the PC station configuration and program can be downloaded.

Figure 7
If an Ethernet communication module is configured as a submodule of WinLC RTX F, as in Figure 8:
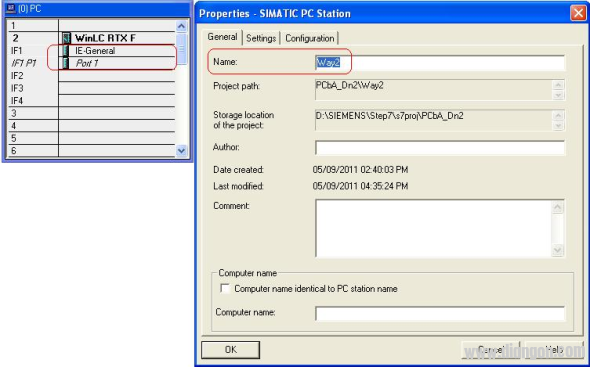
Figure 8
Make appropriate settings in the Station Configuration Editor of the Microbox 427, as shown in Figure 9.
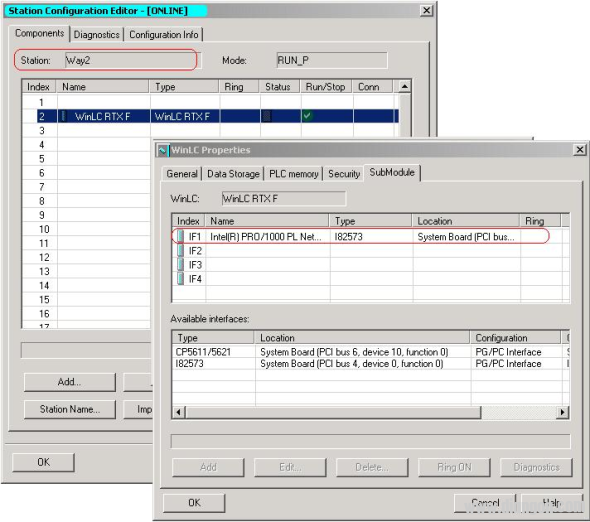
Figure 9
Connect the Ethernet interface of the programming device to the Ethernet interface of the Microbox 427 configured as a WinLC RTX F submodule. Open the "Set PG/PC Interface" window in Step 7 and choose "S7ONLINE (STEP7) → TCP/IP Broadcom NetXtreme 57xx..." to complete the setup. The configuration and program can then be downloaded after starting WinLC RTX F.

Figure 10
Method 3: As shown in Figure 11, a Microbox 427 with WinAC RTX is used. The built-in PROFIBUS interface is configured as a communication card for the PC station, not as a WinLC RTX submodule (SubSlot).
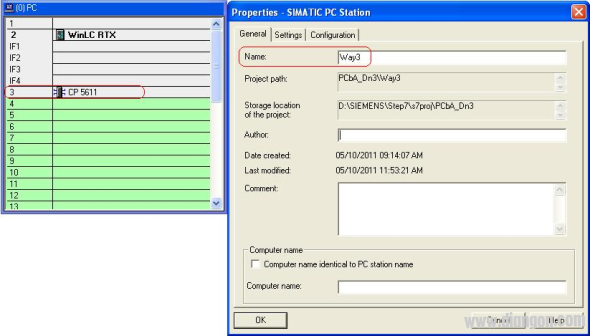
Figure 11
Launch the Station Configuration Manager and set the PC station name to "Way3" in the Station Configuration Editor, matching the hardware configuration. Ensure the components in the virtual slots align with those in the Step 7 project, as shown in Figure 12.
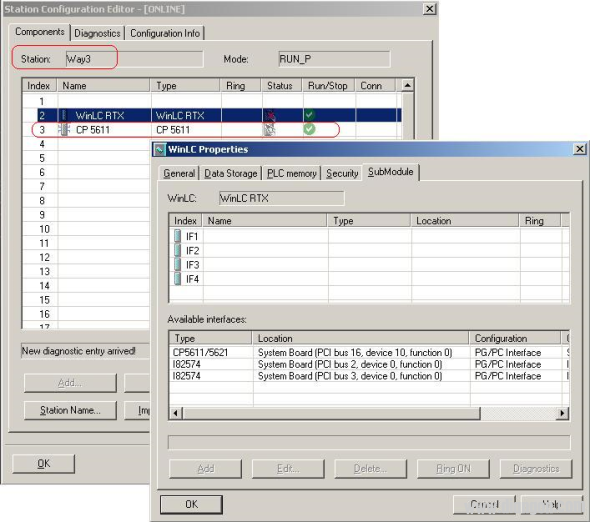
Figure 12
Connect the PROFIBUS interface of the programming device (e.g., a PC with CP5611) to the Microbox 427 via a PROFIBUS cable. Open the "Set PG/PC Interface" window in Step 7 and select "S7ONLINE (STEP7) → CP5611 (PROFIBUS)" to complete the setup. After starting WinLC RTX, the configuration and program can be downloaded.
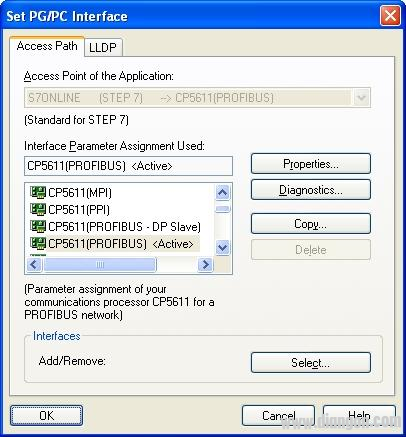
Figure 13
In this case, the programmer routes through the PROFIBUS communication card (CP5611) on the PC station and connects to WinLC RTX, as shown in Figure 14.
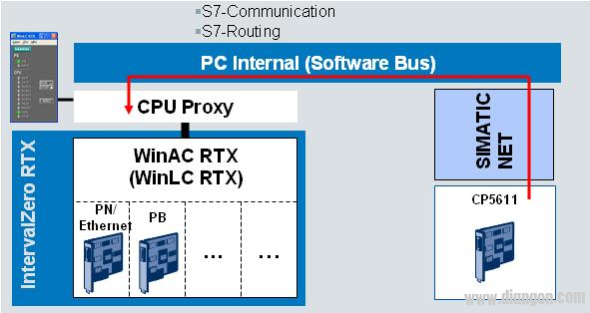
Figure 14
Method 4: As shown in Figure 15, a Microbox 427 with WinAC RTX is used. The Ethernet interface is configured as a communication card for the PC station, not as a WinLC RTX submodule (SubSlot).
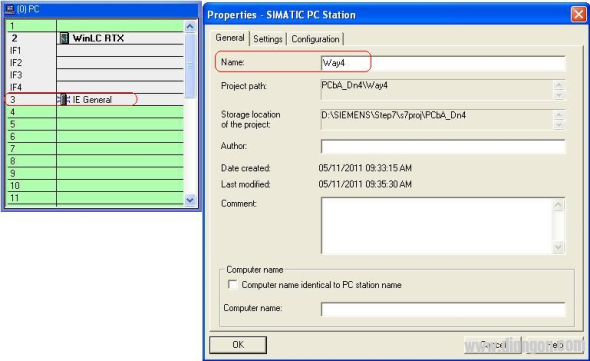
Figure 15
Open the Station Configuration Manager and set the PC station name to "Way4" in the Station Configuration Editor, matching the hardware configuration. Ensure the components in the virtual slots match those in the Step 7 project, as shown in Figure 16.
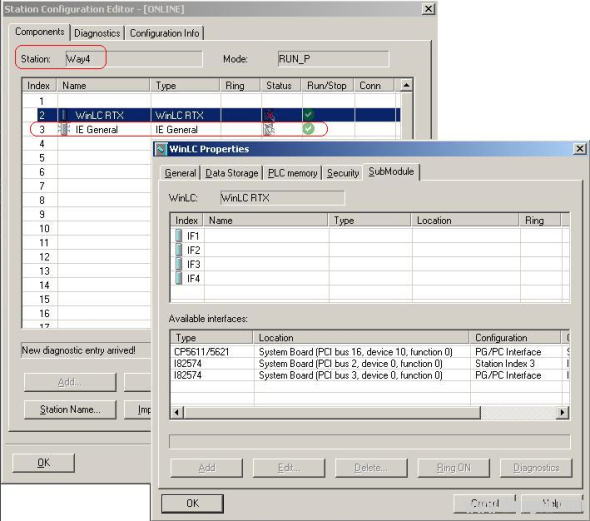
Figure 16
Connect the Ethernet interface of the programming device to the Ethernet interface of the communication card on the Microbox 427. Open the "Set PG/PC Interface" window in Step 7 and choose "S7ONLINE (STEP7) → TCP/IP Broadcom NetXtreme 57xx..." to complete the setup. After starting WinLC RTX, the configuration and program can be downloaded.
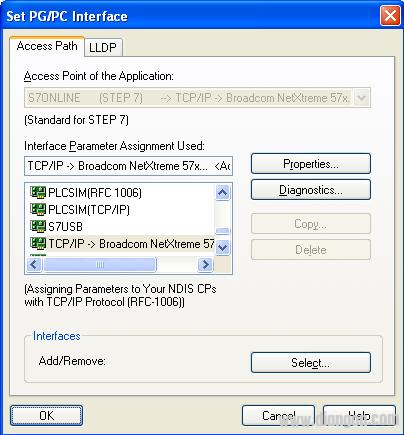
Figure 17
In this scenario, the programmer routes through the Ethernet communication card (IE General) on the PC station and connects to WinLC RTX, as shown in Figure 18.
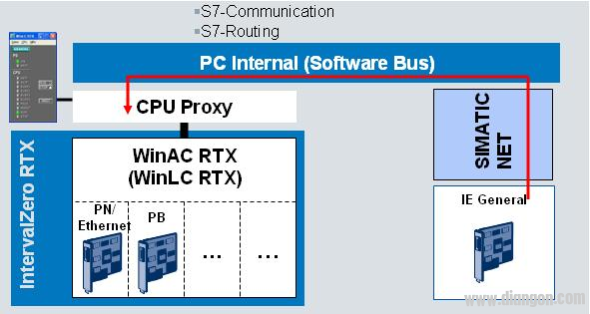
Figure 18
Method 5: To restore a backup, use the "Restore..." option in the Control Panel menu of WinLC RTX. Before restoring, open the operation panel of WinLC RTX, as shown in Figure 19.

Figure 19
Open the backup interface through the "File → Archive..." menu, as shown in Figure 20. Choose a storage location and enter a file name like "WinLC_RTX_Bak", then click "Save" to complete the backup.

Figure 20
To restore, go to "File → Restore..." and select the backup file to begin the recovery process.
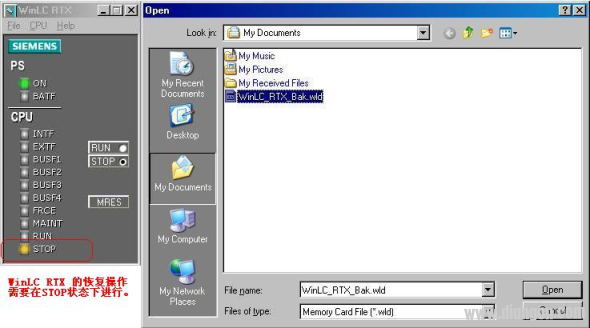
Figure 21
After the recovery is complete, a prompt will appear, as in Figure 22. Click "OK" to finalize the process.
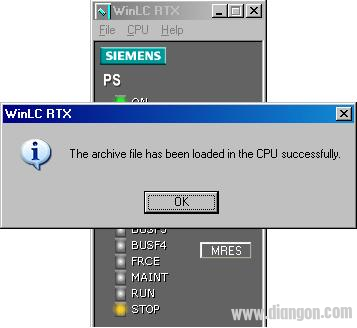
Figure 22
Note: All backup and restore operations must be performed while WinLC RTX is in STOP mode.
Heat Shrinkable Braided Sleeving
braided heat shrinkable tube,braided heat shrink tubing,braided heat shrink sleeve,braided heat shrink,wiring loom wrap
Dongguan Zhonghe Electronics Co., Ltd. , https://www.zhonghesleeving.com